How to Setup Cricut on Computer? (Complete Tutorial)
If you recently got a new Cricut machine for crafting and want to learn ‘how to setup Cricut Machine on your computer‘, then you’re in the right place. This post will guide you through the setup with easy, time-saving steps – no need to deal with long or confusing tutorials.
The complete setup process includes downloading and installing Cricut Design Space, creating a Cricut ID, connecting your machine to your computer, and completing the setup by registering your crafting machine.
Step 1: Download Cricut Design Space
The process of downloading and installing Cricut Design Space is slightly different for Windows and macOS. Let’s discover how:
For Windows
- Firstly, open your web browser and type Cricut.com/setup in the address bar.
- After that, select your machine model from the options provided on the webpage.
- Then, you’ll see options to download Cricut Design Space for Windows.
- Choose the correct version that matches your computer’s operating system.
- Now, click the Download button, and the installer file will start downloading on your computer.
- Next, find the downloaded installer file (usually in your Downloads folder).
- Double-click the file to open the installer.
- After installation, launch the Cricut Design Space app.
For macOS
- First, open your preferred web browser (e.g., Safari or Chrome) on your Mac.
- Then, visit the official Cricut website, Cricut.com/setup.
- Next, look for the download link or button for Cricut Design Space for macOS.
- You may need to agree to Cricut’s Terms of Use and Privacy Policy.
- Now, click the Download tab to start downloading the Cricut Design Space file (usually a DMG file).
- Once the download is complete, find the downloaded file in your Downloads folder and double-click on the .dmg file to open it.
- Drag the Cricut Design Space application icon to your Applications folder.
- Go to your Applications folder and double-click to open it.
- Enter your password to authorize the installation.
Step 2: Create a Cricut Account ID
Now that you have downloaded the ‘Cricut Design Space Software‘ on your computer successfully, open the application on your device and then follow the instructions given below to create a Cricut ID:
- After opening the Cricut software, you will see a page asking you to choose either ‘Create Cricut ID‘ or ‘Sign In‘ using your Cricut credentials.
- Click the ‘Create Cricut ID’ or ‘Create Account’ button.
- Then, you need to input your first name, last name, email ID, and a secure password.
- Read the terms of use and privacy policy and check the box to agree.
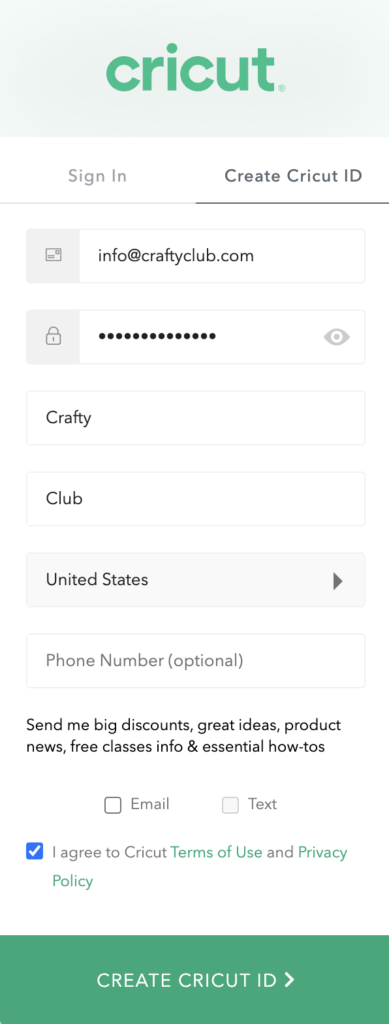
- Click the button to finalize your account creation.
- You can now sign in to Cricut Design Space with your new ID and password.
Step 3: Connect Cricut Machine to Your Computer
Connection is an important step in the setup procedure. And when it comes to connecting, Cricut offers two methods. One is to connect instantly, that is, the wired method, and the other is called the wireless method, also known as the Bluetooth method.
Method 1: Wired Connection (USB)
- Power on your Cricut machine.
- Open the ‘Cricut Design Space software‘ on your computer.
- Plug one end of the USB cable into your machine and the other into a USB port on your computer.
- Follow the on-screen instructions within ‘Cricut Design Space‘ to select your machine and complete the setup process.
Note: Many devices will display a notification on the device screen indicating it is connected.
Method 2: Wireless Connection (Bluetooth)
- Make sure your machine is plugged into a power source, and don’t forget to turn it on.
- Position your machine within 10-15 feet of the device you’ll be connecting it to, a computer or phone.
- Go to your device’s Bluetooth settings.
- Turn on Bluetooth on your computer.
- Click on Add Bluetooth or other device and choose Bluetooth from the list of options.
- Select your ‘Cricut machine model‘ name from the list.
- If prompted for a PIN during Bluetooth pairing, enter 0000 (common for older Cricut models).
Now, your Cricut machine should be all setup and ready to use for your next project – just open Cricut Design Space and start creating.
Step 4: Register Machine and Finish Setup
Registering your Cricut machine is crucial for setup as it unlocks access to the full range of features, including software updates, design resources, and the ability to connect with the Cricut community.
- Open Cricut Design Space software and click on the drop-down arrow beside your account name.
- Next, you’ll see options like profile, notifications, settings, and help.
- Then, click on the Machines tab along the top.
- Now, you’ll find the New Product Setup option at the top, click Start.
- Click the drop-down menu under ‘Machine Calibration’ and select your machine model.


Comments
Post a Comment